Ahhh yes!! Your new computer has arrived! Purchasing a new computer can be an exciting, expensive, and slightly stressful experience. Don’t worry though, you can set yourself up for success in a few easy steps. Let’s talk about how to set up a new computer!
*note: over 95% of my readers are using Apple products, so I will be giving Mac specific examples. Most of these steps would still apply to PC users!
Start Fresh
When I get a new device, whether that be a computer, phone or tablet, I like to start fresh. This means I do not select the “restore from backup” option on my new device. When you do a full restore from an old device, your old device problems and clutter come with it. However, when you start fresh, you have the opportunity to get organized right away. This will take some extra time, but it will be worth it in the long run!
NOTE: if you are in a place where you need to get back to work fast, restoring from a Time Machine backup is okay as well. Restoring from a Time Machine backup will bring everything over from your old computer as it was, so the steps below may not be needed! Again, I do prefer to start fresh with each device as it ensures that I’m not bringing over old junk/corrupted data!
Log into iCloud
If you’re an Apple user and you have an iCloud account, start off by signing into your Apple ID. You will be prompted to do this when you turn on your device for the first time, so go ahead and do that! If you’re an iCloud user, you will find that things like your contacts, calendars, bookmarks and more will be synced to your new computer.
Adjust Small Settings
Next, I like to tackle adjusting some small settings! The first one I adjust is the mouse (or trackpad) tracking speed. I like my mouse to zip quickly across the screen, so I move the tracking speed up about 80%. I also like to make sure my secondary click is set up. This allows me to use the right click on a Magic Mouse, or use two fingers to right click on a trackpad. You can find these settings in System Preferences > Mouse and/or Trackpad.
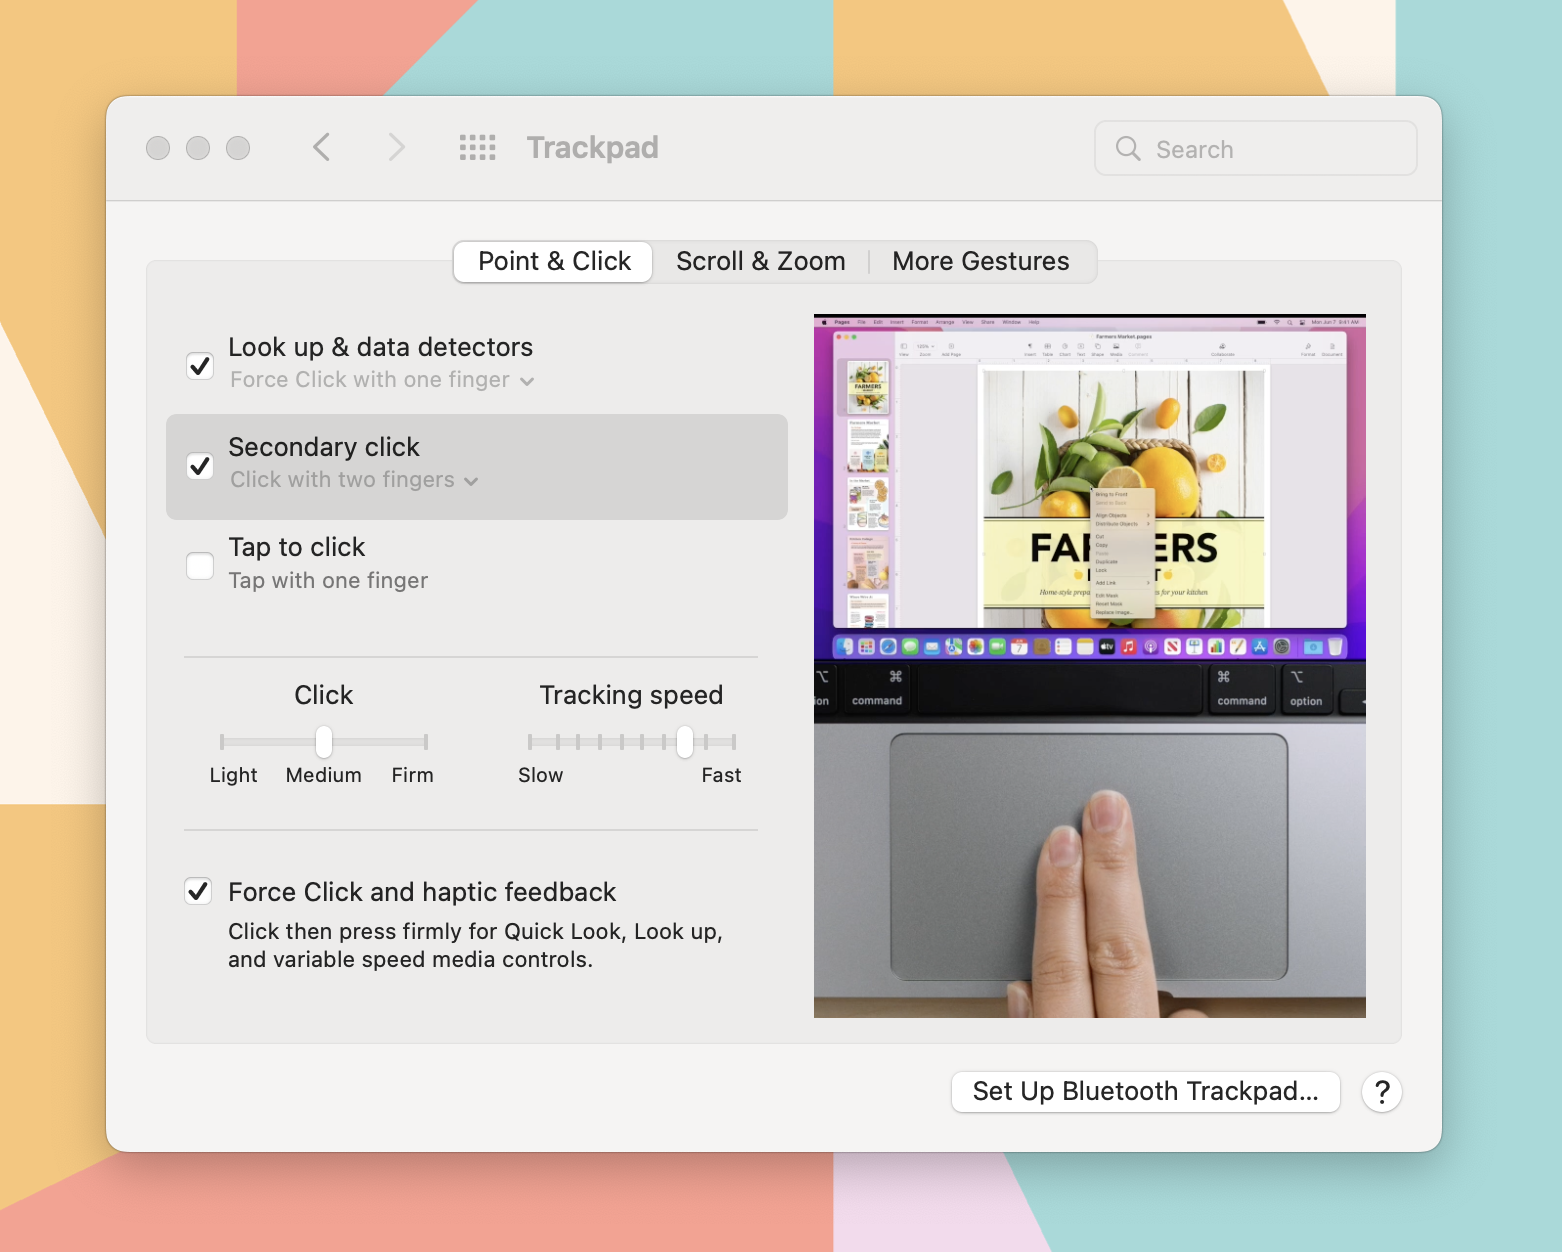
While I’m in System Preferences, I like to go to the Bluetooth section and check the box for “Show Bluetooth in the Menu Bar”. This adds the Bluetooth icon to your top toolbar for easy access. I also do the same for Time Machine by going to System Preferences > Time Machine, and check the box for “Show Time Machine in the Menu Bar”.
Run OS Update
Okay, now that I have my basic settings ready to go, I like to kick things off by checking to see if an Operating System (OS) Update is available. Sometimes our new computer is packaged and shipped before a recent update is released. To check for an OS Update on your Mac, go to System Preferences > Software Update.
Download & Install Apps
After my OS is up to date, I download and install all of the apps I need!
NOTE: It is important to know if your Mac has Apple Silicon (M1, M2, Etc) or if it has an Intel Processor. When downloading some apps, it will ask you if you want the Apple Silicon version or the Intel Version. Make sure you choose the correct option as it will drastically impact how well it works!
To see if you have Apple Silicon or an Intel Processor, click the Apple in the top left, then “About this Mac”. On that window, there will be a line that says “Chip” or “Processor” and what type it is!
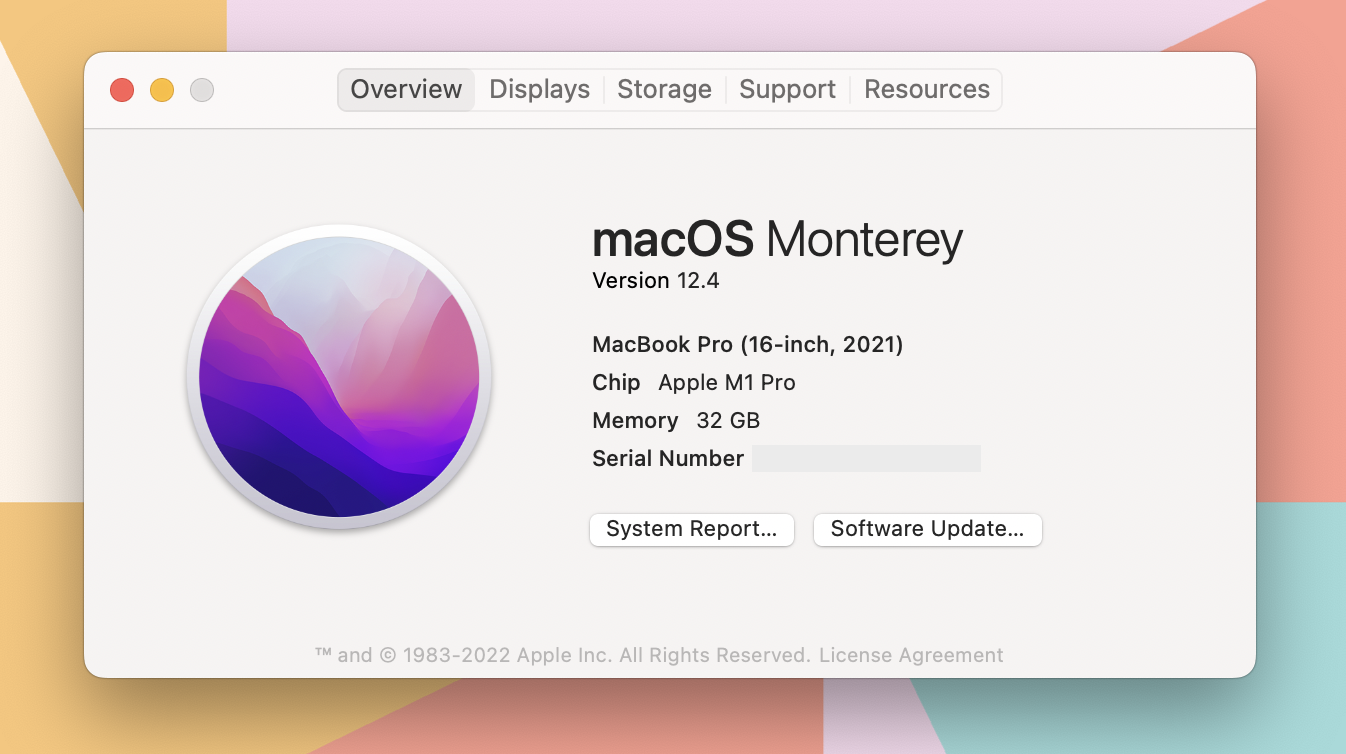
Here’s a screenshot from my Macbook Pro – as you can see, I have an Apple M1 Pro chip, so I will select Apple Silicon if given the option!
Now it’s time to get downloading and installing! Here’s the list of Apps I download right away! Your list might look a little different than mine, and thats totally okay!
- Google Chrome
- Loom
- Click Up*
- Imagen AI*
- Dropbox*
- Adobe Creative Cloud, Lightroom & Photoshop
- Photo Mechanic 6
- Backblaze*
- Canva*
- Jpeg Mini Pro 3
- Spotify
- 1Password
- Apple Pages
- Apple Keynote
- Apple Numbers
While we are talking about Apps – do not download or use any apps that claim to “clean” your computer for you. Some popular examples are MacKeeper, and CleanMyMac. While enticing, these apps can do significant damage to your computer. Avoid at all costs!
Set Up Non-iCloud Accounts
Next, I like to set up any additional accounts like your business email, etc. You can do this in System Preferences > Internet Accounts.
This will look slightly different for everyone, but here’s my current setup if you’re looking for ideas.
- I have a personal iCloud account, and a GSuite/Google For Business account for my business.
- My iCloud account stores all of my contacts, bookmarks, keychain, notes, and personal emails. I use the default Apple mail app for this email address.
- My GSuite (hello@techsavvycreative.com) stores my business email and calendars. By logging into this account in my Internet Account settings, these calendars will appear on my Apple Calendar app. I do NOT sync my email though, and instead use Spark Mail for my business email. This keeps my two email accounts and notifications separate!
Log Into Dropbox/Google Drive
If you use some type of shared storage service, like Dropbox* or Google Drive, this is the point where I login to the application and get things syncing. All of my documents and non-photography files live on Dropbox. This means all of my files will appear on my new computer after I log in and sync!
Transfer Other Files
If you have other important files living on your old computer that are NOT stored on your iCloud drive, Dropbox, etc, now is the time to manually transfer them over. You can do this by Air Dropping the files, putting them on a flash drive/external hard drive, or uploading them to a Cloud storage service like Dropbox, Google Drive, etc!
Download & Install Fonts
If you use custom fonts on your computer, now is a great time to install them! I like to keep all of my font files (.otf or .ttf) in a Dropbox folder so I can easily find them when I need to reinstall them!
Set Up Backups
This is the last, but most important step in my new computer set up process. Protect yourself and your files by setting up a local backup and also a Cloud backup. A local backup when your computer is backed up to an external hard drive that is plugged into your computer. A cloud backup uses the internet to store a backup of your files safely in the cloud. Having both a local and cloud backup is the best way to protect yourself from tech failures!
For a local backup, I use Time Machine. Time Machine is built into your Mac and is easy to set up. Check out this blog post for a full how-to! For cloud backups, I use a tool called Backblaze*. Backblaze is affordable and easy to use, however it does require internet to work. Depending on your internet speed, these backups could take a long time! If you used Backblaze on your old computer, you will want to inherit your backup state so Backblaze doesn’t start from scratch!
Getting your computer juuusssttt right will take a little while, but these steps will get you started in the right direction! So tell me, what shiny new computer are you setting up?!
Be the first to comment